Piano-fying "Old Maid" Card Game
Hi All! Today I'm going to share how I Piano-fy existing games. Do you remember playing "Old Maid" as a child? I do. What a nail biter that game was, not wanting to be stuck with the "Old Maid Card"!
I found these decks at a local store where I live called "Five Below" for $1.00 each. Woohoo! I purchased 8 decks to create many levels of games for my students.
I tend to get right to the point with my blogs, so you'll rarely have to read through paragraph upon paragraph about my life and stuff. So, let's get to it!
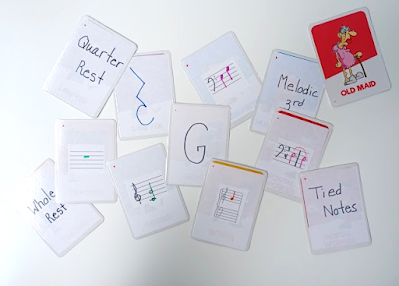
I took a card from a deck checking the size to make sure that the pieces I cut from 8x11 white shipping labels (you know, the sticky adhesive printer paper labels that you print addresses onto and adhere to boxes that you mail to people) would fit the cards, cut the pieces out, peeled the wax paper off, and adhered them onto the inside of the cards. I left the outside of the cards intact as well as not covering the "Old Maid" card. Then depending on what level I was assessing, I drew notes, intervals, musical terms, etc. on some of the cards while handwriting the answers on the other cards like the picture below. I went to "Lakeshore Learning Center" (a local teacher store where they have laminating machines in the back of the store) and laminated all the decks. It seems like a lot of work, but it took just an hour or two to create each deck and I created them while watching TV, listening to a podcast or music so it was pretty easy, and I created the decks over a span of a couple of days. The decks have lasted over 13 years and they're still in great condition.
If you notice in the upper left-hand corner of each card, I drew a colored dot there. Each deck has a different color. That was to keep the decks color coded just in case they got mixed up or if I wanted to combine cards from one deck with another deck.
This game can be played with 2 or more students. I normally play the game with just one student at a time. For the game, I shuffle the cards, pass out all the cards between myself and my student, and place a divider between us so that we could spread our cards out on the table in front of us to easily and quickly find any matching sets without trying to hold all of the cards in our hand at once. If you're playing with just one student, you both start out with a lot of cards and it's difficult to hold all of them in your hand while trying to figure out which of your cards match.
The Game: Once all of the cards are passed out, all players need to put aside any matching cards they may have in a pile next to them. Then everyone holds up their remaining cards in their hands. This is where I take the divider away. The game can go clockwise or counterclockwise, you choose. One player picks a card from another player and sees if they have a match for it. If they do, they put it aside, if they don't, they add the card to the other cards in their hand. The game goes around and around until all cards have been matched and one player gets stuck with the "Old Maid".
If we were playing this game the way it was intended to be played then the person stuck with the "Old Maid" card would be the one who loses the game BUT since it's piano-fied, I tell my students that if the cards they matched together are correct then they've won the game (and have earned a sticker on their prize sheet) regardless of whether they get stuck with the "Old Maid" card or not.
This has turned out to be one of my students' favorite games to play. Even my middle school students love playing this game.
If you end up trying this out, let me know how it goes! I'd love to hear from you. Until next time, piano blogger signing off.........................


Comments
Post a Comment